Create a Snap to calculate gas fee percentages
This tutorial walks you through creating a Snap that calculates the percentage of gas fees they would pay for their transaction.
It gets the current gas price by calling the eth_gasPrice RPC
method using the global Ethereum provider made available to Snaps, and displays this as a percentage
of gas fees in a tab in MetaMask's transaction confirmation window.
Prerequisites
- MetaMask Flask installed
- An account on your MetaMask Flask instance with testnet ETH
tip
You can use Infura's Sepolia faucet to get Sepolia ETH.
- A text editor (for example, VS Code)
- Node version 20.11 or later
- Yarn
Steps
1. Set up the project
Create a new Snap project using the
@metamask/create-snap
starter kit by running:
yarn create @metamask/snap transaction-insights-snap
Next, cd into the transaction-insights-snap project directory and run:
yarn install
This initializes your development environment with the required dependencies.
Did you get a warning?
You may get a warning such as:
@lavamoat/allow-scripts has detected dependencies without configuration. explicit configuration required.
run "allow-scripts auto" to automatically populate the configuration.
You can resolve the issue by running:
yarn run allow-scripts auto
2. (Optional) Customize your Snap's UX
This Snap is generated from a TypeScript template Snap. We recommend customizing your Snap to improve its UX, but this is optional for testing. If you don't wish to customize your Snap, skip to Step 3.
2.1. Provide an icon
Optimize your metadata and display an icon for your Snap in MetaMask.
Create a new folder images in the Snap package packages/snap/:
mkdir packages/snap/images
Download
this gas.svg icon file
into that ìmages folder.
Icon attribution
This is a free icon, "Gas" by Mello from the Noun Project.
Your file structure should look like this:
transaction-insights-snap/
├─ packages/
│  ├─ site/
|  |  |- src/
|  |  |  |- App.tsx
|  |  ├─ package.json
|  |  |- ...(React app content)
|  |
│  ├─ snap/
|  |  ├─ images/
|  |  |  |- gas.svg
|  |  ├─ src/
|  |  |  |- index.test.ts
|  |  |  |- index.ts
|  |  ├─ snap.manifest.json
|  |  ├─ package.json
|  |  |- ... (Snap content)
├─ package.json
├─ ... (other stuff)
Open packages/snap/snap.manifest.json in a text editor. This file contains the main configuration
details for your Snap. Edit the npm object, within the location object, and add iconPath with
the value "images/gas.svg" to point to your new icon:
"location": {
  "npm": {
    "filePath": "dist/bundle.js",
    "iconPath": "images/gas.svg",
    "packageName": "snap",
    "registry": "https://registry.npmjs.org/"
  }
}
Open packages/snap/package.json in a text editor. Edit the files array and reference the
images/ folder:
"files": [
  "dist/",
  "images/",
  "snap.manifest.json"
],
2.2. Update your Snap's name
Optimize your metadata and update
your Snap's name in MetaMask.
MetaMask uses the proposedName of the Snap, currently "TypeScript Example" in the template.
Open packages/snap/snap.manifest.json in a text editor.
Edit the "proposedName" property within the metadata to provide a functional name such as "Gas Percentage Calculator":
{
  "version": "0.1.0",
  "description": "An example Snap written in TypeScript.",
  "proposedName": "Gas Percentage Calculator",
  ...
}
2.3. Disable the non-functional button
Open packages/site/src/pages/index.tsx in a text editor.
The template comes with a button, SendHelloButton, that is non-functional for this example.
To prevent a user triggering errors, disable SendHelloButton by updating disabled={!installedSnap} as follows:
button: (
  <SendHelloButton
    onClick={handleSendHelloClick}
    disabled={true}
  />
),
These three updates are the minimum required to ensure that each user interaction with your Snap is well-informed. However, your Snap will function without these tweaks.
3. Enable transaction insights and the Ethereum provider
To enable your Snap to provide transaction insights and
use the global Ethereum provider, request the
endowment:transaction-insight and
endowment:ethereum-provider
permissions in packages/snap/snap.manifest.json:
"initialPermissions": {
  "endowment:transaction-insight": {},
  "endowment:ethereum-provider": {}
},
In this tutorial, you can replace what was previously in initialPermissions.
You do not need any permissions other than endowment:transaction-insight and endowment:ethereum-provider.
4. Calculate and display the percentage of gas fees
To calculate and display the gas fees a user would pay as a percentage of their outgoing transaction,
replace the code in packages/snap/src/index.ts with the following:
- JSX
- Functions
import type { OnTransactionHandler } from "@metamask/snaps-sdk";
import { Box, Heading, Text, Bold } from "@metamask/snaps-sdk/jsx";

// Handle outgoing transactions.
export const onTransaction: OnTransactionHandler = async ({ transaction }) => {

  // Use the Ethereum provider to fetch the gas price.
  const currentGasPrice = await ethereum.request({
    method: "eth_gasPrice",
  }) as string;

  // Get fields from the transaction object.
  const transactionGas = parseInt(transaction.gas as string, 16);
  const currentGasPriceInWei = parseInt(currentGasPrice ?? "", 16);
  const maxFeePerGasInWei = parseInt(transaction.maxFeePerGas as string, 16);
  const maxPriorityFeePerGasInWei = parseInt(
    transaction.maxPriorityFeePerGas as string,
    16,
  );

  // Calculate gas fees the user would pay.
  const gasFees = Math.min(
    maxFeePerGasInWei * transactionGas,
    (currentGasPriceInWei + maxPriorityFeePerGasInWei) * transactionGas,
  );

  // Calculate gas fees as percentage of transaction.
  const transactionValueInWei = parseInt(transaction.value as string, 16);
  const gasFeesPercentage = (gasFees / (gasFees + transactionValueInWei)) * 100;

  // Display percentage of gas fees in the transaction insights UI.
  return {
    content: (
      <Box>
        <Heading>Transaction insights Snap</Heading>
        <Text>
          As set up, you are paying <Bold>{gasFeesPercentage.toFixed(2)}%</Bold>
          in gas fees for this transaction.
        </Text>
      </Box>
    ),
  };
};
import type { OnTransactionHandler } from "@metamask/snaps-sdk"
import { heading, panel, text } from "@metamask/snaps-sdk"

// Handle outgoing transactions.
export const onTransaction: OnTransactionHandler = async ({ transaction }) => {
  // Use the Ethereum provider to fetch the gas price.
  const currentGasPrice = (await ethereum.request({
    method: "eth_gasPrice",
  })) as string

  // Get fields from the transaction object.
  const transactionGas = parseInt(transaction.gas as string, 16)
  const currentGasPriceInWei = parseInt(currentGasPrice ?? "", 16)
  const maxFeePerGasInWei = parseInt(transaction.maxFeePerGas as string, 16)
  const maxPriorityFeePerGasInWei = parseInt(
    transaction.maxPriorityFeePerGas as string,
    16
  )

  // Calculate gas fees the user would pay.
  const gasFees = Math.min(
    maxFeePerGasInWei * transactionGas,
    (currentGasPriceInWei + maxPriorityFeePerGasInWei) * transactionGas
  )

  // Calculate gas fees as percentage of transaction.
  const transactionValueInWei = parseInt(transaction.value as string, 16)
  const gasFeesPercentage = (gasFees / (gasFees + transactionValueInWei)) * 100

  // Display percentage of gas fees in the transaction insights UI.
  return {
    content: panel([
      heading("Transaction insights Snap"),
      text(
        `As set up, you are paying **${gasFeesPercentage.toFixed(2)}%**
        in gas fees for this transaction.`
      ),
    ]),
  }
}
If you have previously developed a dapp, you're likely familiar with accessing the Ethereum provider
using window.ethereum. In a Snap, the window object is not available. Instead, when you request
the endowment:ethereum-provider permission, your Snap is granted access to the
ethereum global object.
5. Build and test your Snap
Complete the following steps to build and test your Snap:
5.1. Build your Snap
From the command line, run yarn start.
The following displays:
You can now view site in the browser.

 http://localhost:8000/
Open localhost:8000 in your browser (with MetaMask Flask installed).
A template test dapp displays, for installing and testing your Snap.
5.2. Test your Snap
Select Connect and accept the permission request.
After connecting, you're prompted to install the Snap with the following permissions:
- Access the Ethereum provider
- Fetch and display transaction insights
Next, select Confirm > OK.
From MetaMask Flask, create a new testnet ETH transfer.
You can set up multiple accounts to transfer between your accounts.
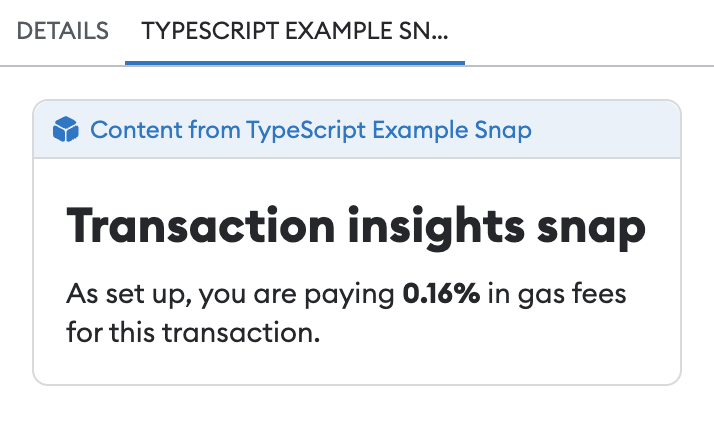
Next, from the transaction confirmation window in MetaMask, switch to the tab named TYPESCRIPT EXAMPLE SNAP (or Gas Percentage Calculator if you followed Step 2).
Switching to the tab activates the onTransaction
entry point of your Snap and displays the percentage of gas fees in the transaction insights UI:
The template Send message button is inoperable. The default template Snap used in Create a gas estimation Snap is configured to expose a JSON-RPC API with a simple hello command, which brings up a dialog box. In contrast, the Snap you're creating in this tutorial doesn't expose an API. Instead, it provides transaction insights directly in a tab in MetaMask's transaction confirmation window.
Next steps
Consider improving your Snap's functionality further.
Display a different UI for contract interactions
Your Snap displays a gas fee percentage for ETH transfers initiated by the user.
For contract interactions, add the following code to the beginning of the onTransaction entry point:
- JSX
- Functions
if (typeof transaction.data === "string" && transaction.data !== "0x") {
  return {
    content: (
      <Box>
        <Heading>Gas Percentage Calculator</Heading>
        <Text>
          This Snap only provides transaction insights for simple ETH transfers.
        </Text>
      </Box>
    ),
  };
}
if (typeof transaction.data === "string" && transaction.data !== "0x") {
  return {
    content: panel([
      heading("Gas Percentage Calculator"),
      text(
        "This Snap only provides transaction insights for simple ETH transfers."
      ),
    ]),
  }
}
Customize your Snap
You can improve your Snap's UX by completing Step 2. Consider
updating packages/site/src/pages/index.tsx to remove the
non-functional Send message button.
Before publishing a Snap, it's also important to customize the metadata and properties of your Snap, for example:
- Update the
locationinsnap.manifest.jsonto your Snap's published location. - Update the
descriptioninsnap.manifest.jsonto a description of your Snap. - Update the
name,version,description, andrepositoryfields of/packages/snap/package.json(even if you do not plan to publish your Snap to npm).
When editing source, the shasum is set automatically when you build from the command line.
The version and repository fields in snap.manifest.json inherit the values from
package.json and overwrite them in snap.manifest.json.
We recommend updating version and repository in package.json first, then building the Snap project.
After you've made all necessary changes, you can publish your Snap to npm.